Wednesday, February 3, 2021

Poker Table Build

I've decided to build a new poker table with a raised rail.  Kind of an ambitious project but since I already have a poker table, I can take my time.

I'll document as much as I can of the process, with a ton of info for those curious enough to build something like this or for feedback from those that have.

I decided on a slightly shorter table than a traditional 10 person table, but slightly wider than the compact tables.  The final table should comfortably hold 8 players, but could accommodate 9 no problem.   Final overall dimensions will be 84" x 44".

Rough plans for the Raised Rail table

The first job was to cut the 4' x 8' sheets of plywood into 84" x 44".  That meant cutting off 12" on the length and 4" on the width.  Since I don't own a table saw I used 2x4s clamped along the 3 boards stacked.  The job went smoothly with some minor chipping along the edges.

Next step was to round the corners, that meant a 22" arc along all the boards.  I was debating using a jigsaw or router and decided on the router for a more accurate cut.  In order to guide the router along the corners I had to devise a jig.  Using pegboard, I made a pretty poor jig since pegboard is a little pliable around the pivot point so the accuracy wasn't perfect.  But it did a decent job.


The cutting took two days, the cuts themselves weren't too bad (did 2-3 passes per router cut) it was the constant battle with the accuracy of the jig.  Final step was rounding the edges of the rail.


Finally all the cuts are made, next step is order materials.

For portability, I'm going to install foldable legs.  Ordering online it would run me $45 plus $40 for delivery, so I looked into the classifieds in my area and luckily found a banquet table for $20 that I could re-use the legs from. Overall I saved $65! 


All pieces are ready, now it's time to upholster the table top and rail.  I decided to start with the surface, it doesn't really matter, whatever your preference.

First I sprayed half of the surface piece with a spray adhesive, laid the foam on that half and then sprayed the other half.  I let the foam set for an hour, then cut away the excess.


Next I laid the speed cloth (good side down) and put the top face down.  Starting from the sides, I pulled the cloth, stapled, and made way from end-to-end.  I had to pull a few staples at the end to tighten up the middle, hopefully will remain nice and taught for the installation.


Stretching the speed cloth

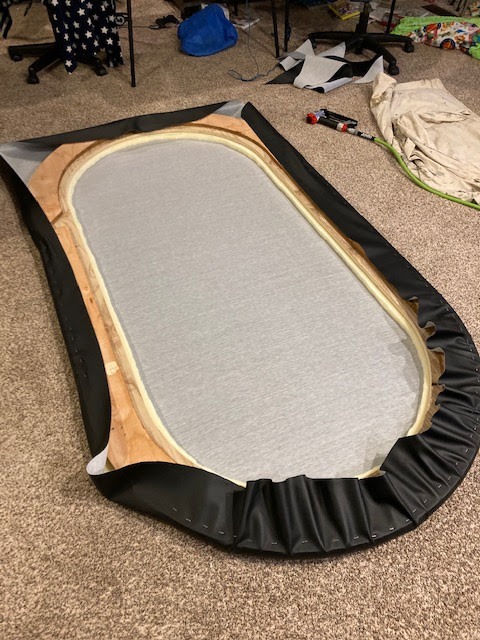
With the playing surface done, now it was on to the rail.  The rail is the most complicated part with a raised partition for the led lights, and vinyl upholstery.  To start the rail, I used the spray adhesive to add the 1" foam.


Once the foam is applied, I then added the vinyl with a million staples.  This is where a pneumatic stapler helps.


It took a couple of hours for the padded rail, but I am happy with the result.  Putting the rail up against the surface, you can get a glimpse of the colour scheme I chose.


Next step is preparing the base mount.  I stained and put a thin layer of Polyurethane, then set out the hardware orientation to plan.


After arranging the layout, I had to router out the recess for the carrying handles, once completed, could screw in all the hardware.  I got the idea of the handles from a fellow table-maker called Irish, he gave me some great tips.


All the pieces are finally constructed, ready for assembly.  First step is installing the LEDs, then installing cup holders, and finally assembling it all together.


The LEDs were stuck on the interior of the spacer

Next up was mounting the rail.  The underside of the speed cloth was a mess of wrinkles and staples.  I used good-ol ducktape to seal under the edge.  Not proud of this solution, but it worked and nobody will really see this.  Last step on the rail was to mount, alight, and fasten with about 10 screws.


I also thought about how to add drink holders for those folks not close enough to a nearby table.  I decided to attach 16 Ga construction fasteners under the rail and slip in drink holders and voila.  One issue I noticed right off the bat was that the edges of the cup holder was pretty sharp so I didn't want to risk slicing the rail.  Bending aluminum is tricky, it's a very tense metal that doesn't succumb to bending easily.  I managed to bend it slightly downwards in a vice, then applied the inner lip to a grinder which dulled it, but leaves heat marks.  I actually don't care too much about the heat scarring since I don't really host a high end uppity game, but note that it does leave the holders with a tampered look.


Some of you have asked how I set up the portable drink holders so here are a few additional photos.  I basically cut half of a building fastener in half, used a step bit to add a few additional screw holes. In order to have a minimal but sufficient gap for the holder, some slight bending in the vice along with installing it with the cup holder in place will help achieve the right slide gap.


Ok, so now I'm getting close to completion!


Monday, July 6, 2020

Preparing for the Wurl

After chatting with DaveR and AndreC, I decided to do the Wurl (Wasatch Ultimate Ridge Linkup)

For the first attempt, I've done some water/food drops along the way which has helped me prepare for the first attempt and give me some idea of what it's like up there.

The weather report looks pretty good and hot for the 3 days I will be doing the first attempt, hopefully all will work out!

Sunday, November 15, 2015

My own personal Bond film ranking: from Dr. No to Spectre

Personal Bond film ranking after seeing Spectre:

RankFilmComment
25The World Is Not Enough (1999)Terrible. Denise Richards playing a Physicist, named Christmas?
24Die Another Day (2002)Slightly better than The World is not Enough, that's all.
23Tomorrow Never Dies (1997)Look like they ran out of ideas for Bond after GoldenEye.
22Never Say Never Again (1983)Remake of Thunderball.
21The Living Daylights (1987)Can barely remember anything from this forgettable film.
20Quantum of Solace (2008)Yuck. Some decent scenes, but too long and mostly forgettable.
19A View to a Kill (1985)Excellent villain. Bond looks like he should have retired though.
18Octopussy (1983)Some redeeming scenes, but not one of the better bonds. Excellent Villain.
17Moonraker (1979)Often panned, but not a bad movie. Jaws is pretty terrifying in the role.
16Licence to Kill (1989)Better movie for Dalton, worth seeing. Bond goes rogue!
15The Spy Who Loved Me (1977)Great action sequences.
14The Man with the Golden Gun (1974)Scaramanga and little Nick Hack make for great villains.
13Diamonds Are Forever (1971)Excellent location in Las Vegas, the villains in this movie make it good, albeit a little campy.
12Live and Let Die (1973)Great Bond filmed in a New Orleans setting.
11Skyfall (2012)Long, but original plot and great storyline.
10You Only Live Twice (1967)Austin Powers stole a lot of ideas from this classic.
9On Her Majesty's Secret Service (1969)Refreshing timepiece, ensured that you don't have to be Connery to pull off a Bond.
8From Russia with Love (1963)Connery lives James Bond in this film. Epic fight scene on train.
7GoldenEye (1995)Perhaps the best plot for any Bond movie. Great all round cast.
6Spectre (2015)A "best of" Bond. Throwbacks to previous Bond scenes, looks like they broke the bank with some of the action scenes.
5Casino Royale (2006)Bond is back with this movie. A little long, but some great scenes here.
4Dr. No (1962)The first bond movie I ever saw. Amazing movie.
3Thunderball (1965)Perhaps Connery's best? Was so good they had to do an unofficial remake.
2For Your Eyes Only (1981)Has it all. Great bond girls, great action, great scenery.
1Goldfinger (1964)Gave life to a lot of James bond'isms. Never boring.

Wednesday, October 1, 2014

My week of Soylent

As part of Soylent's kickstarter, I ordered a week's supply to try it out.  I'm too much of a fan of eating real food to ever consider exclusively using Soylent as my main food supply, but thought it would be fun to try and see how it makes me feel.

Day 1

First off, the preparation is extremely simple, add the packet to the pitcher, mix with water and provided oil, and let sit in the fridge overnight.

The concoction is pretty thick, so gulping it down quickly was not an option for me.  I can't argue the convenience of using Soylent, I got up, took 5 minutes to drink before my bikeride to work, pack a liter for work, and that was it.

I was pretty bloated the first day, so didn't consume the full day's amount which was really surprising, I thought I would not have nearly enough.  Felt good, no energy crash all day.

Day 2

The second day was a little better than the first.  I wasn't keen on drinking a cold brown liquid first thing in the morning, but as soon as I downed a glass felt ready for the ride to work.

Felt less bloated all day, and therefore consumed more Soylent, consumed exactly a day's worth I would guess.  Again, no energy crash, felt pretty good all day.

Day 3 

We're going to a party tonight, they're serving Pizza and I wonder how I will feel mingling with people eating food in front of me.

Monday, April 15, 2013

WCF protocol error


This one was driving me up the wall, but after setting up a WCF tcp endpoint, I kept getting an error similar to:

net.tcp://... is unavailable for the protocol of the address

Solution is to re-install the Service model with:


C:\Windows\Microsoft.NET\Framework64\v4.0.30319>ServiceModelReg.exe -r 
 
Hope that helps someone out!

Thursday, January 10, 2013

Making my own wine rack


So I decided to put our loose wine bottles somewhere so they would be out of the way, but easy to find a bottle.

I could have easily drank them all, but after further thought, decided to convert one of our downstairs closets into a mini wine cellar.

I was originally going to build it in place, but my wife convinced me to build it so it could be relocated in the future, so I started to think out a design.

I decided to build it using Pine wood (I like the look and it's reasonably priced), only the supports were non-pine (fir).

Here is a link to the construction:

https://plus.google.com/photos/104338446149726978470/albums/5830527587073893329

I made it to hold 18 bottles, 6 per row.  I build the rows separately, and then mounted on the 2x2 supports.

Wednesday, January 18, 2012

Adding PostgreSQL db to Asp.Net web project on Windows 7

Last night I was trying to connect an existing Asp MVC 3 app to use an PostgreSQL database.  It is using nHibernate, so I'm still going to have to determine if I need to tweak anything there, but for now just wanted to connect properly.

After installing Postgre, I needed to install the ODBC connector in order to establish a connection in my .Net application.  There was a little trick, when I used the ODBC configurator from the Start menu, I didn't see the newly installed ODBC adapter!  WTF?  Turns out, since I was running a 64 bit version of my OS, I had to run c:\windows\syswow64\odbcad32.exe in order to set my new ODBC driver.  There is also another way...

Install NpgSQL adapter, I used the latest .Net 4.0 install.  After referencing the Npg dll in your project (plus an associated Mono dll), you can simply use their wrappers in order to connect, here you can get the gist:

using NpgSQL;
var connstring = String.Format("Server=localhost;Port=5432;User Id=;Password=xxx; Database=DbName;");
var conn = new NpgsqlConnection(connstring);
conn.Open();
const string sql = "SELECT LastName FROM Users ORDER BY LastName LIMIT 10";
var da = new NpgsqlDataAdapter(sql, conn);
var ds = new DataSet();
da.Fill(ds);